

This post explores the fundamentals of Bash scripting, focusing on how it’s used in data science workflows and how to write more effective scripts. It builds upon the core concepts presented in the Data Umbrella webinar, Intro to Bash Scripting.
Intro to Bash Scripting: by Rebecca BurWei
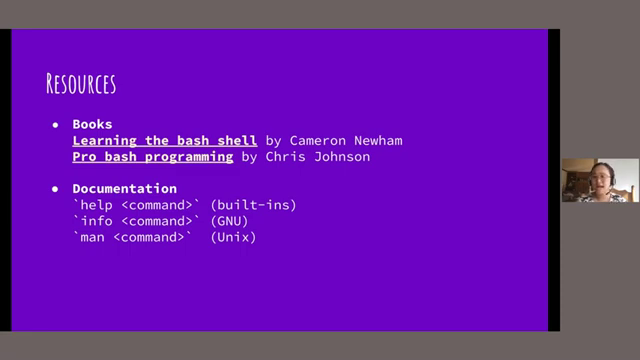
Resources
- Repo: https://github.com/rebecca-burwei/intro-to-bash-scripting/
- Slides: https://docs.google.com/presentation/d/1X9pOOEFOIK2oI26VvuNKRBC8psIM8HnGqOZ6fOUF8jM/
- Bash file examples: https://github.com/rebecca-burwei/intro-to-bash-scripting/tree/main/bin
Section Timestamps of Video
- 00:00 Data Umbrella Introduction
- 04:05 Rebecca begins presentation
- 05:24 Agenda
- 05:39 What is bash? A brief history of shells
- 06:56 What is bash used for?
- 07:58 Scripting basics + resources
- 09:36 What does this code do? Analyzing an ETL script
- 11:20 (three min. of quiet time begins)
- 14:24 Begin code walkthrough
- 15:33 Deeper dive on curl and ssconvert
- 18:33 Continuing code walkthrough
- 20:16 Quick summary
- 20:45 Making the code into a script
- 22:45 Making the script executable
- 24:17 Running the script
- 25:52 Turning code into a script - best practices
- 26:01 Ways to customize your bash environment
- 26:54 Customize bash environment - .bashrc example
- 28:36 Song break + interactive chat time
- 33:06 Returning from break, reviewing chat
- 34:27 Improving the script - error handling + demo
- 41:04 Error handling - more resources
- 41:24 Improving the script - logging + demo
- 46:15 Improving the script - options + demo
- 50:00 (two min of quiet time begins)
- 52:05 Continuing options demo
- 54:16 Summary + mentorship/collaboration
- 55:07 Q&A - ssconvert/gnumeric, GNU, esac
What is Bash and Why Use It?
Bash is a command-line interpreter that allows users to interact with Unix-like operating systems (e.g., macOS, Linux). A fun fact, Bash stands for “Born Again Shell”, which is just a play on the name of that first shell. It’s a powerful tool for tasks like file management, process control, and job automation. While not typically used for core data analysis tasks like model building or statistical analysis, Bash is invaluable for setting up environments, managing files, and automating repetitive tasks.
A Basic ETL Script in Bash
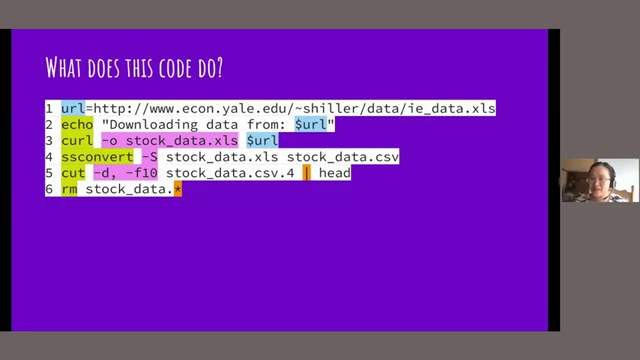
Let’s examine a simple script that performs an Extract, Transform, Load (ETL) process. This script downloads an Excel file, converts it to CSVs, extracts a specific column, and then cleans up the downloaded files.
#!/bin/bash
# Title: Process Data
# Date: 2024-03-14
# Author: Rebecca BurWei
# Version: 1.0
# Description: Download data, convert to CSV, extract column, and clean up.
# Options: None

URL="http://www.econ.yale.edu/~shiller/data/ie_data.xls"
echo "Downloading data from $URL"  # Print a message indicating the download source.
curl -O stock_data.xls "$URL" # Download the file using curl. The -O option saves it with its original name.
ssconvert -S stock_data.xls stock_data.csv # Convert the Excel file to multiple CSV files (one per sheet).
cut -d, -f10 stock_data.csv.4 | head  # Extract the 10th column (using comma as delimiter) and display the first few lines.
rm stock_data* # Remove all downloaded and created files (using wildcard *).
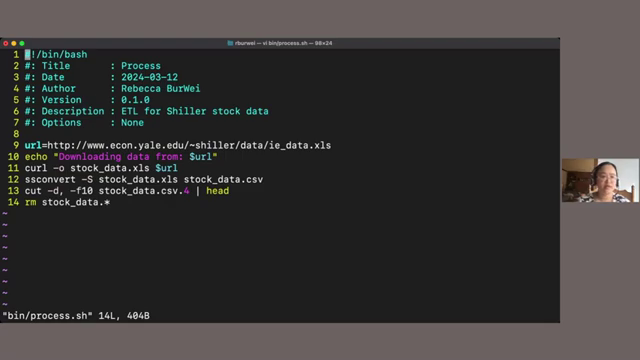
The script begins with a shebang (#!/bin/bash), which specifies the interpreter. The first comment is a special one. It’s a special type of comment called a shebang or a hashbang. It then defines a variable URL containing the download link. The echo command prints a message to the console. The curl command downloads the file, and ssconvert converts it into multiple CSV files. So I think this will not work if you don’t have SS convert installed. The cut command extracts the 10th column, using a comma (,) as the delimiter, and head displays the first few lines of the output. Finally, rm removes the downloaded and created files.
To make this code executable as a script, save it in a file (e.g., process.sh), and use the chmod command to grant execute permissions:
chmod u+x process.sh
so I’m going to give the owner execute permissions so that the script can be run by using chmod.
You can run the script using either source process.sh (runs in the current shell) or ./process.sh (runs in a subshell). If you type just the name on then the current shell will create a subshell and run your script in just that subshell. The latter is generally preferred for cleaner execution.
source process.sh

Bash provides several files to [customize your environment](https://youtu.be/1pQ527fGhVQ?si=lGkFFhyLODqmZLEP&t=1559).  Key files include:

1.  **`.bash_profile`**:  Executed upon login (opening a new terminal). There's a bash profile and this will run on login.
2.  **`.bashrc`**: Executed when a new subshell is started.
3.  **`.bash_logout`**: Executed upon logout, useful for cleanup tasks.

These files can be used to set aliases, define environment variables, export variables, and configure shell behavior.

## Enhancing the Script: Error Handling

By default, Bash continues execution even if a command encounters an error. This behavior can be modified. One approach is to use `set -e` (or `set -o errexit`), which causes the script to exit immediately upon encountering an error. [ You can set air exit and this will make the bash stop when it runs into an error.](https://www.youtube.com/watch?v=1pQ527fGhVQ&t=796s)

A more robust approach is to use `trap`.  `trap` allows you to define custom actions to be taken when specific signals are received.  A common use case is to handle the `ERR` signal, which is triggered when a command exits with a non-zero status (indicating an error).

Here's how to implement error handling with `trap` in the script:

```bash
#!/bin/bash
# ... (previous comments) ...

handle_error() {
  echo "Error on line $1 with exit status $?"
  exit 1
}

trap 'handle_error $LINENO' ERR

URL="invalid_url" # Introduce an error for demonstration.
echo "Attempting to download data from $URL"
curl -O "$URL"
ssconvert -S stock_data.xlsx stock_data.csv
cut -d, -f10 stock_data.csv.0 | head
rm stock_data*
In this modified script, handle_error is a function that prints an error message including the line number ($1, passed from $LINENO) and the exit status ($?). $1 refers to the first argument or the first positional parameter and $? refers to the status code or the exit status of the last command that was run. The trap command associates this function with the ERR signal. Setting URL to an invalid value demonstrates the error handling in action.
Enhancing the Script: Logging
Instead of printing output directly to the terminal, it’s often beneficial to redirect output and errors to files. This is called logging.
You can achieve this using redirection operators:
>redirects standard output (stdout) to a file.>>redirects standard error (stderr) to a file.
Here’s how to modify the script execution to implement logging:
./process.sh > output.txt 2> errors.txt
So anything that would have gone to the terminal on standard out, send that to this file instead.
This command runs process.sh and redirects its standard output to output.txt and its standard error to errors.txt.
To encapsulate the logging within a separate script, you can use a wrapper script like this. Here is the logger.sh script:
#!/bin/bash
# ... (comments) ...
# Options:
#   $1: Path to the script to be logged.

"$1" > "${1}_output.txt" 2> "${1}_errors.txt"
This logger.sh script takes the path to another script (passed as the first positional parameter, $1) and executes it, redirecting output and errors to files with appropriate names.
Enhancing the Script: Adding Options
Using positional parameters ($1, $2, etc.) can be fragile because the order matters. Options (e.g., -f, -d) provide a more robust and user-friendly way to configure script behavior. The getopts built-in command helps parse options.
Here’s a modified version of the script that accepts an -f option to specify the columns to extract:
#!/bin/bash
# ... (previous comments) ...
# Options:
#   -f <fields>: Comma-separated list of fields to extract.

while getopts "f:" opt; do
  case $opt in
    f)
      fields="$OPTARG"
      ;;
    \?)
      echo "Usage: $0 [-f <fields>]"
      exit 1
      ;;
  esac
done

URL="http://www.econ.yale.edu/~shiller/data/ie_data.xls"
echo "Downloading data from $URL"
curl -O "$URL"
ssconvert -S stock_data.xlsx stock_data.csv
cut -d, -f"$fields" stock_data.csv.0 | head
rm stock_data*
This version uses getopts "f:" opt to parse the -f option. In line 16, that string f colon tells you about the valid options. The colon after f indicates that it requires an argument. The case statement handles the option: if -f is provided, its value (accessed via $OPTARG) is stored in the fields variable. So fields would be 10 or 10,1. If an invalid option is provided, a usage message is printed, and the script exits. The cut command now uses -f"$fields" to extract the specified columns. The esac closes out the case statement. When you create a lot of these control structures, like you type case to start it, and then ESAC, which is case backwards, to end the case statement, to tell Bash, you know, case part is done.
These examples show how to build upon a simple Bash script to add functionality, improve robustness, and make it more user-friendly.
About the Speaker: Rebecca BurWei
Rebecca BurWei is a Staff Data Scientist at Mozilla. She has a patent in computer vision and a PhD in mathematics. She learned to code in open-source communities, and is passionate about developing the technical leadership of others.
Connect with the Speaker
- GitHub: rebecca-burwei
- LinkedIn: Rebecca BurWei